
Replacing a heating oil tank involves several key steps: drain the old tank, disconnect pipework safely, prepare a strong non-combustible base, position the new tank at safe distances, connect pipework and valves, and fill and bleed the system. Using a certified professional ensures safety, compliance with UK regulations, and protection against leaks and environmental damage.
Heating oil remains a crucial source of warmth and hot water for thousands of homes across the UK, especially in rural and off-gas areas. Over time, oil tanks can deteriorate, leak, or become non-compliant with modern safety standards. Replacing your heating oil tank is not only important for maintaining a safe and efficient heating system but also for protecting your property and the environment.
Many homeowners are unsure when or how to replace a tank. Doing it incorrectly can result in leaks, fire hazards, or invalidated home insurance. This detailed guide explains everything you need to know about replacing a heating oil tank, including why it may be necessary, legal and safety considerations, step-by-step replacement procedures, and tips for working with professionals.
Why You May Need to Replace Your Heating Oil Tank
Over time, oil tanks can become unsafe or inefficient. Some of the main reasons for replacement include:
- Corrosion or rust: particularly with older steel tanks
- Leaks or seepage: which can contaminate soil and water
- Non-compliance with current regulations: older tanks may not meet OFTEC or building standards
- Structural damage: such as cracks or weakened bases
- Frequent maintenance issues: including blocked lines or sediment accumulation
- Upgrading to a larger or bunded tank: for added capacity and environmental protection
Replacing a tank before it fails helps prevent environmental damage, costly repairs, and potential health or safety risks.
Legal and Regulatory Considerations
In the UK, the installation and replacement of heating oil tanks must comply with several regulations. The most important include:
- OFTEC standards: the Oil Firing Technical Association sets installation, maintenance, and replacement guidelines
- Building Regulations Approved Document J: covers oil-fired heating appliances and storage tanks
- Environmental protection laws: to prevent oil spillage, contamination, and pollution
Failure to comply with these standards can result in fines, invalid insurance cover, and potential liability for environmental damage.
Safety Precautions before Replacing a Tank
Replacing a heating oil tank involves working with flammable liquids and heavy equipment. Safety should always come first.
- Turn off all oil supply lines: isolate the boiler and shut off valves
- Drain remaining fuel: remove any residual oil safely for storage or proper disposal
- Wear personal protective equipment: gloves, goggles, and protective clothing
- Ensure proper ventilation: to avoid inhaling fumes
- Keep fire extinguishers nearby: in case of accidents
- Check weather conditions: avoid replacement during rain or high winds to reduce risk of spillage
Never attempt tank replacement alone unless you are fully trained and authorised. Working with a certified professional is highly recommended.
Preparing for Tank Replacement
Before the new tank arrives, careful planning is essential. Key steps include:
- Measure available space: ensure the new tank fits comfortably while meeting legal distance requirements
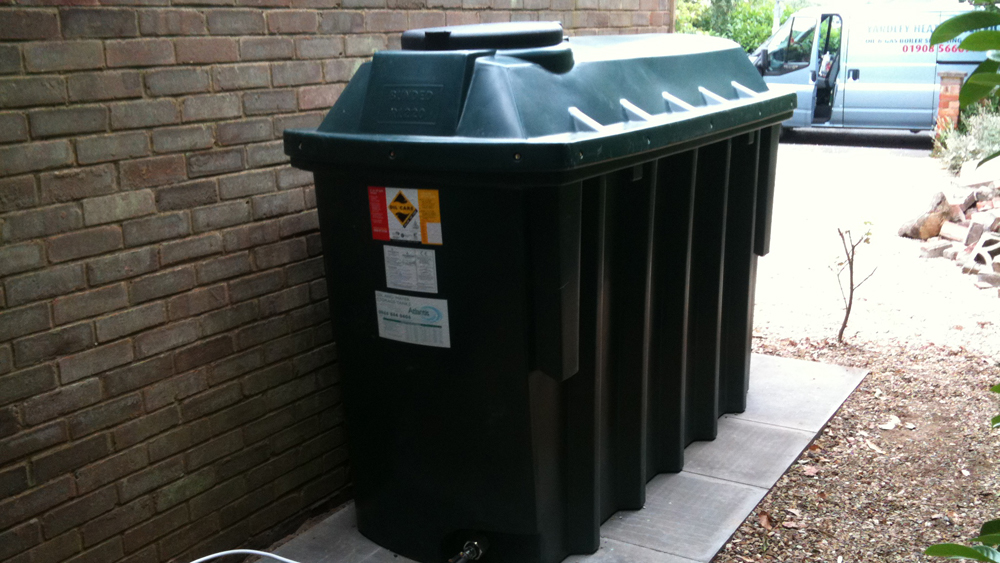
- Select the appropriate tank type: single skin, double skin (bunded), plastic or steel, based on property needs and environmental protection requirements
- Check delivery access: make sure the oil delivery lorry can reach the installation site
- Prepare a suitable base: typically a concrete slab or solid paving that extends at least 300mm beyond the tank edges
- Plan pipework and fittings: including valves, filters, and venting points
- Notify relevant authorities if required: some local councils may require notification for tank replacement in sensitive areas
A well-prepared site ensures that installation proceeds smoothly and safely.
Step-by-Step Guide to Replacing a Heating Oil Tank
While only trained professionals should handle actual installation, understanding the steps helps homeowners plan and supervise the process.
Remove the Old Tank
- Ensure all oil has been drained and stored safely
- Disconnect all pipework and vent lines
- Remove any tank supports or securing straps
- Carefully lift the tank off its base using appropriate lifting equipment
- Dispose of the old tank in accordance with local regulations
Inspect and Prepare the Base
- Check the old base for cracks or instability
- Level and clean the surface thoroughly
- Pour a new concrete slab or place paving slabs if necessary
- Allow the base to cure and dry completely before installing the new tank
Position the New Tank
- Place the new tank on the prepared base
- Ensure it is level and stable
- Position the tank so it maintains the required safety distances:
- At least 1.8 metres from buildings, doors, and windows
- At least 760mm from fences or boundaries
- Away from drains, watercourses, and flood-prone areas
- Ensure easy access for oil delivery and maintenance
Connect the Pipework
- Attach supply lines to the boiler
- Install vent lines and fill points correctly
- Include any necessary filters, check valves, or safety devices
- Test all connections for leaks using safe methods
Fill and Test the Tank
- Partially fill the tank to check for stability and leaks
- Observe the pipework and fittings during initial fill
- Adjust or tighten connections if necessary
- Once confirmed safe, fill to the required capacity
Bleed and Restart the Heating System
- Air may have entered the system during replacement
- A professional will bleed the lines to remove trapped air
- Restart the boiler and check for proper operation
- Monitor for any unusual noises, leaks, or pressure drops
Choosing the Right Tank
Selecting the right tank is just as important as the replacement process itself. Consider:
- Capacity: typical domestic tanks range from 1,000 to 3,000 litres
- Material: steel for durability, plastic for corrosion resistance
- Bunded tanks: double-skinned for environmental protection
- Compatibility: ensure the tank works with your existing boiler and pipework
Bunded tanks are increasingly recommended in the UK to meet environmental standards and prevent spills.
Environmental Considerations
Oil spills can cause serious contamination of soil and water. To minimise risks:
- Use bunded tanks wherever possible
- Ensure the base is level to prevent tipping or leaking
- Inspect tanks regularly for rust or damage
- Keep the area around the tank clear of debris
- Use drip trays under valves if required
- Avoid placing tanks near drains or streams
Professional installers like 123 Oil follow these practices to ensure safety and compliance.
Costs of Replacing a Heating Oil Tank
The cost of replacing a tank varies depending on size, material, and complexity of the installation. Factors include:
- Tank size and type
- Labour costs for professional installation
- Base preparation and site work
- Pipework, valves, and fittings
- Disposal of old tank
- Optional accessories like monitors or bunding
While upfront costs may seem high, replacing a tank proactively is cheaper than dealing with leaks, environmental clean-up, or boiler damage.
Maintenance after Replacement
After installation, proper maintenance ensures longevity and safety:
- Check for signs of corrosion or damage regularly
- Keep the tank area clear of vegetation or debris
- Schedule annual inspections with a certified technician
- Monitor fuel usage and order oil before levels get too low
- Ensure safety devices like vents and filters are functioning
Regular maintenance extends the life of your tank and protects your home.
Signs You May Need another Replacement
Even after installing a new tank, pay attention to potential issues:
- Unusual noises or vibrations
- Persistent odours of oil
- Visible rust or cracks on the tank
- Frequent breakdowns in the heating system
- Reduced heating efficiency
Identifying problems early prevents costly emergencies and environmental damage.
Conclusion
Replacing a heating oil tank is a major but necessary investment for UK homeowners who rely on oil heating. A well-chosen, correctly installed tank ensures:
- Safe and reliable heating
- Compliance with regulations
- Protection against leaks and environmental damage
- Long-term cost savings
By understanding the replacement process, planning the installation site, and working with certified professionals like 123 Oil, homeowners can enjoy peace of mind knowing their heating system is safe, efficient, and compliant.
Frequently Asked Questions
A domestic heating oil tank should generally be replaced every 15–20 years, or sooner if it shows corrosion, leaks, or damage.
No, replacing a tank involves flammable liquids and heavy equipment. A certified professional should handle the installation.
Most tank replacements don’t require planning permission if they remain on private property and meet OFTEC and building regulations.
Choose a tank based on capacity, material (steel or plastic), and safety features. Bunded tanks are recommended for environmental protection.
Costs vary depending on tank size, material, installation complexity, and base preparation, but proactive replacement is cheaper than emergency repairs.